


Creating a Nuget Package
As part of a Wiliam learning project, I needed to find a way to make a reusable component that could be used for the rest of our developers as a starting point on future projects. My first thought was simple to commit the scaffolding project to Bitbucket for developers to fork as needed, but I also wanted a way to make the component easily upgradable. Then I thought – could I make this a Nuget package that was privately hosted in our infrastructure?
Nusepc file format
First we need to understand the format of a .nuspec file. This is the main component of a Nuget package; it’s the manifest that explains where everything in the package resides and where it should be placed during installation. It’s fairly logical and is in standard XML format.
<?xml version="1.0" encoding="utf-8" ?>
<package>
  <metadata>
    <id>Nuget.Package.Name</id>
    <version>1.0.0</version>
    <title>Nuget Package Name</title>
    <authors>Company Ltd.</authors>
    <owners>Joe Smith</owners>
    <licenseUrl>https://www.website.com/terms</licenseUrl>
    <projectUrl>https://www.website.com/project</projectUrl>
    <iconUrl>https://www.website.com/logo.png</iconUrl>
    <requireLicenseAcceptance>false</requireLicenseAcceptance>
    <description>A description of your package</description>
    <releaseNotes>Initial 1.0.0 release</releaseNotes>
    <copyright>Copyright 2018 CompanyLtd</copyright>
    <tags>sample nuget</tags>
    <dependencies>
      <dependency id="bootstrap" version="4.1.1" />
      <dependency id="FontAwesome" version="4.7.0" />
    </dependencies>
    <summary> A summary of your package </summary>
  </metadata>
  <files>
    <file src="readme.txt" />
    <file src="transforms\web.config.install.xdt" target="content\web.config.install.xdt" />
    <file src="transforms\views.web.config.install.xdt" target="content\Views\web.config.install.xdt" />
    <file src="App_Data\Models\**" target="content\App_Data\Models" />
    <file src="Controllers\**" target="content\Controllers" />
    <file src="Models\**" target="content\Models" />
    <file src="Views\**" target="content\Views" />
    <file src="Helpers\**" target="content\Helpers" />
    <file src="Content\**" target="content\Content" />
  </files>
</package>
The format is self-explanatory. Refer to the docs for more details.
The id must be unique if the package is to be hosted on Nuget.org but that’s not the aim of our project, so make it what you like.
The version is crucial to how Visual Studio Nuget Package Manager will interpret updates to the package. Start with 1.0.0 and increment in the usual major/minor/patch structure. Once a package is installed in a project, Package Manager will keep track of changes and show an upgrade icon if it detects a new version available on the Nuget server (local or remote).
The title and authors fields are obvious, though with authors you can match these to existing Nuget.org authors to form a link that can be navigated.
The dependencies group lists other Nuget packages you want to be automatically installed before your package. This is powerful in that you can define specific versions that will work with your project or allow it to get the latest version in the repository. You need to enter the exact name and version as shown on Nuget.org for a match to be found.
The files list is the most important aspect of a Nuget package. You can leave it out entirely and let the package automatically add everything, but this may have side-effects so it’s best to be explicit.
File nodes have a src parameter and optional target parameter. The src is where the file/folder resides in your file system; most likely in a Visual Studio project. The target refers to where the file will be copied to during creation of the Nuget Package itself. There are specific folders used for package creation that determine how they will be handled during installation of the package. In my example above you can see most are going into a content folder. Content folders are where static files will be copied to and obey the same hierarchy as defined in your local folder structure. If I wanted to include a DLL library, I would use the target of lib. Packages are framework-agnostic, which is why they don’t just assume binaries live in Bin like a .NET project.
You can see some variations in the example above.
- txt - If you include this file, it will automatically be opened by Visual Studio once the package has completed installation. Use this for information about your package that can’t be communicated in the summary
- Content files – Regular files that you want installed into the destination project via the package such as .cshtml, .cs, .css, .js etc. are content files. You can define that all files in a folder are to be included by specifying with two asterisk i.e. **
- Transforms – you can easily transform web and app config files during installation of the package. The examples above include properties that need to be added to the assumed existing configs found at the src Pay attention to the naming convention of the files, and the standard transform attributes below. Example:
<?xml version="1.0" encoding="utf-8" ?>
<configuration xmlns:xdt="http://schemas.microsoft.com/XML-Document-Transform">
  <appSettings>
    <add key="ClientValidationEnabled" value="true" xdt:Locator="Match(key)"/>
    <add key="UnobtrusiveJavaScriptEnabled" value="true" xdt:Locator="Match(key)" />
  </appSettings>
</configuration>
Creating a Nuget Package
As I am familiar with Visual Studio, I decided to treat the package itself as a project.
Pre-requisites:
- Install Nuget CLI. This is required so you can create the package from command line.
- Install Nuget Package Manager. This is a useful tool to inspect a package after it is created.
Create the project:
- Create a new blank solution in Visual Studio
- In the root of the solution add a blank text file. This will be your nuspec file. Name it the same as the name you will give your Nuget package e.g. “Nuget.Package.Name.nuspec”. Copy the template from the top of this post, or go to the source.
- Add the content and lib files to the project you want included. You can add references as usual that are required for the project to build, but they won’t be added to the package itself. Add any config transforms.
- Build the project
Create the package
- In command line or PowerShell, navigate to your project directory.
- Run: nuget pack Nuget.Package.Name.nuspec. If all goes well you should now have a generated .nupkg file
- Open the generated .nupkg file in Nuget Package Manager and see if it looks correct.
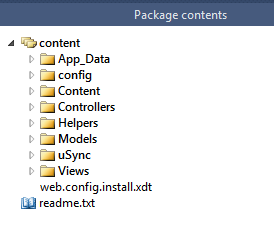
Installing the package
- Choose a folder on your computer or a network share drive to act as your local Nuget repository. A network drive will make it easy for other developers to use the repository.
- Copy your created Package to this folder
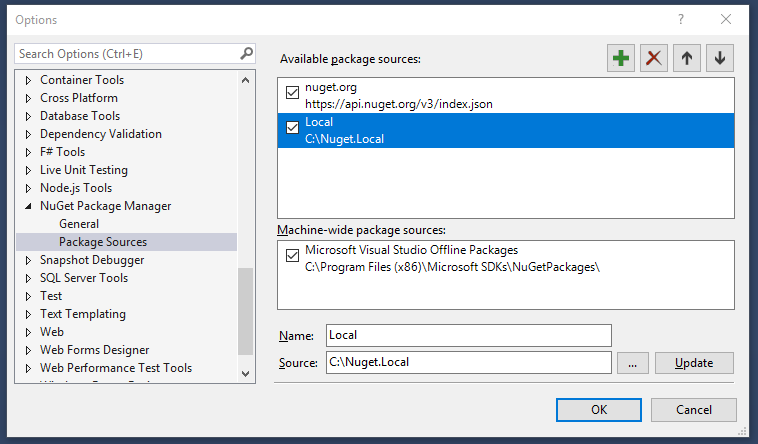
- In Visual Studio go to the Tools menu > Options.
- Open the Nuget Package Manager node
- Add a new Repository to a local or network path
- Ensure the new repository is ticked active. You only need to set this up once
- Create a new Project (e.g. MVC Project)
- Go to Nuget Package Manager > Manage Packages for this Solution and select your new local repository
- Click the Browse tab. Your new package should be available to install.
- Install the package. The console should show any dependencies you specified in the .nuspec being installed first, and you will need to agree to their terms and conditions as usual. Once finished, your readme.txt (if you have one) will load.
That’s it! Enjoy experimenting with Nuget package creation, particularly how to manage upgrade paths to new versions.