


Secure custom CMS with Umbraco Security
You’ve got a custom CMS and want to incorporate it into your Umbraco solution using a single login. The trick to this is ensuring your MVC application can reference the login credentials of your Umbraco solution and check if that user has permissions to access your new application. Here is a hack fest to achieve that.
Step 1 – Umbraco side of things
In your Umbraco solution you will need to set up the new application. The new application is for linking Umbraco Users that you want to have access to you custom CMS solution. For this exercise will call our application AuxContent for Auxiliary Content. The first thing to do is load up the /Config/applications.config and insert a new application definition like this:
<add alias="auxContent" name="Auxiliary Content" icon="auxContent.png" sortOrder="8" />
Once this is done you can load up IIS and reset the Application Pool for your site. This will flush out the site cache and make the new Auxiliary Content application available for users.
Log back into Umbraco and go to the Users panel and select a user. The [auxContent] application should now appear in the Sections part of the profile as shown below.
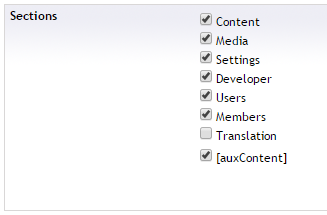
Don’t worry about the [auxContent] text. It is telling you that there is no specific definition for the name of the application in the /umbraco/config/lang/en.xml file. You can give your application a friendly name by adding a new definition to the file:
<area alias="sections">
....
<key alias="auxContent">Auxilary Content</key>
</area>
Once the Application Pool on IIS resets the [auxContent] title in User management should be replaced with the friendly title set above.
You’ll notice there is a broken image in the Sections tab where your new application link should be appearing. In our application definition above we set auxContent.png as the image for the application. Umbraco looks for that image in the /Umbraco/Images/Tray folder. Place your icon in this folder and the Umbraco will load it with your next refresh. A good resource for guidelines on creating your own icon can be found at: http://our.umbraco.org/projects/developer-tools/custom-section-tray-icon-template
Step 2 – Set up IIS
The next step is to add the custom CMS site as an Application to your Umbraco website. Open up IIS and find your Umbraco website entry. Right click on the website and select the Add Application option. Give it an alias such as auxContent and map it to the physical path of your custom CMS website.
If your Umbraco website was set up as http://myumbraco.localhost you would be able to access your auxContent application with http://myumbraco.localhost/auxContent.
One thing to take note of is inheritance of web.config settings from your Umbraco website to the custom CMS website set up as a sub application. Conflicts can arise if class libraries from one solution conflict with the other.
Update the Umbraco website web.config file by wrapping all content you do not want inherited with:
<location path="." inheritInChildApplications="false">
...
</location>
More information on the location setting can be found on MSDN at http://msdn.microsoft.com/en-us/library/b6x6shw7%28v=vs.71%29.aspx
Step 3 – Umbraco User Control Redirect
The next step is to have the custom CMS Website load in Umbraco when clicking the application icon in the Sections panel.
Add the following code to the /config/dashboard.config file:
<section alias="AuxContentDashboardSection">
    <areas>
      <area>auxcontent</area>
    </areas>
    <tab caption="Aux Content">
      <control>/usercontrols/auxcontent.ascx</control>
    </tab>
  </section>
This definition means when a user clicks on the auxcontent application icon it will load the /usercontrols/auxcontent.ascx User Control in the Umbraco content panel.
Add the auxcontent.ascx User Control to the /UserControls folder. The code for this page is only a redirect to the custom CMS Website path set up in IIS above:
public partial class auxcontent : System.Web.UI.UserControl
{
    protected void Page_Load(object sender, EventArgs e)
    {
		Response.Redirect("/auxContent/", true);
    }
}
If all has gone to plan you should now be able to refresh the Application Pool in IIS, load up Umbraco Admin and click the Auxiliary Content icon which loads the custom CMS Website inside Umbraco.
Step 4 – Security Check
A separate Class Library will be used to perform the security check. This Class Library is then added as a reference to the custom CMS which checks if the site is secure.
First add a new Class Library Project to your solution. In this case called UmbracoSecurityModule
Next add a new ADO.NET Entity Data Model (edmx) file to the project. You then need to connect to the Umbraco database used for your Umbraco Website and map the following tables:
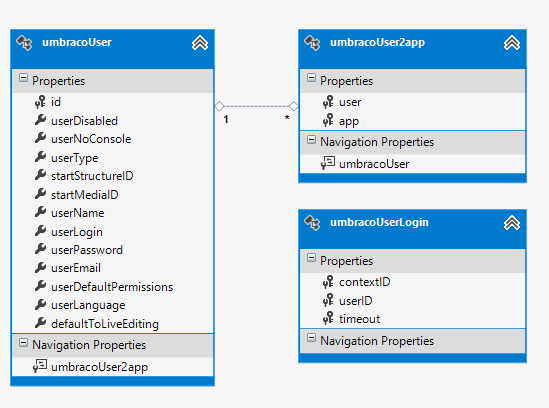
Next add the following classes to the project:
public class UserData
{
	public string userContextId { get; set; }
}

public class UmbracoSecurity
{
	public bool isSecure { get; set; }

	public UmbracoSecurity()
	{
		isSecure = checkSecure();
	}

	public bool checkSecure()
	{
		Guid contextID;
		string umbracoUserContextID = (HttpContext.Current.Request.Cookies["UMB_UCONTEXT"] != null) ? HttpContext.Current.Request.Cookies["UMB_UCONTEXT"].Value.ToString() : "";

		if (string.IsNullOrEmpty(umbracoUserContextID))
			return false;

		string userData = FormsAuthentication.Decrypt(umbracoUserContextID).UserData;
		var jsSerializer = new JavaScriptSerializer();
		UserData user = jsSerializer.Deserialize(userData);

		if (!Guid.TryParse(user.userContextId, out contextID))
			return false;

		string umbracoApplicationName = "auxContent";

		using (var context = new umbracoDbDSN())
		{
			return (from p in context.umbracoUser2app
					where p.app == umbracoApplicationName
					&& p.user == (from l in context.umbracoUserLogins
					  where l.contextID == contextID
					  select l.userID).FirstOrDefault()
					select p).Any();
            }
        }
    }
}
Umbraco stores user information in the UMB_CONTEXT cookie:
It is encrypted so needs to be decrypted in order to extract the current users userContextId:
string umbracoUserContextID = (HttpContext.Current.Request.Cookies["UMB_UCONTEXT"] != null) ? HttpContext.Current.Request.Cookies["UMB_UCONTEXT"].Value.ToString() : "";
Once decrypted it then needs to be deseralized into a class object:
string userData = FormsAuthentication.Decrypt(umbracoUserContextID).UserData;
A check is done to ensure the userContextId is a valid GUID:
if (!Guid.TryParse(user.userContextId, out contextID))
			return false;
The security check is then done by doing a lookup in the edmx file against the user and the created auxContent application:
using (var context = new umbracoDbDSN())
{
	return (from p in context.umbracoUser2app
			where p.app == umbracoApplicationName
			&& p.user == (from l in context.umbracoUserLogins
			  where l.contextID == contextID
			  select l.userID).FirstOrDefault()
			select p).Any();
	}
}
The returned result is a Boolean value indicating if the currently logged user has access to that application.
You can tweak this in many ways by not having a static umbracoApplicationName and making it more dynamic. You could add in flags to turn security checks on and off also.
Step 5 – Hook up Application to Security
The final step is hooking the Security Check Class Library into the custom CMS. Add the UmbracoSecurityModule as a reference to your custom CMS so it has access to the security methods.
Using a MVC application as the custom CMS you can add a custom authorize attribute to any controller methods to check for security. Adding a check to the HomeController can be done as:
public class HomeController : Controller
{
	//
	// GET: /Home/

	[AuthorizeUser]
	public ActionResult Index()
	{
		....
		.....
	}
}
Set up the [AuthorizeUser] attribute as a custom validator with the following class:
public class AuthorizeUser : AuthorizeAttribute
{
	protected override bool AuthorizeCore(HttpContextBase httpContext)
	{
		UmbracoSecurity umbracoSecurity = new UmbracoSecurity();
		return umbracoSecurity.isSecure;
	}

	protected override void HandleUnauthorizedRequest(AuthorizationContext filterContext)
	{
		filterContext.Result = new RedirectToRouteResult(new System.Web.Routing.RouteValueDictionary(new { controller = "InSecure", action = "Index" }));
	}
}
The above combination will now check if the current user is logged into Umbraco and has access to the Auxilary Content Application Home Controller. If they do not have access they are sent to the InSecure view which contains information that they need to login into the site.
Further controllers can then be secured by adding the [AuthorizeUser] attribute to those controllers.
This should now result in loading a custom CMS Application that checks user logins in Umbraco and only provides access to those that validate.